Organizations need to publish data concerning their negotiations to:
Advertise the purchase to increase competition.
Comply with rules and regulations regarding proper competition.
To accomplish these goals, Oracle Sourcing provides the capability for a buying organization to create abstracts and forms.
Abstracts
An abstract is a summary or synopsis of a negotiation. It usually contains information such as the goods or services being purchased, whom to contact for more information, and the open and close date. An abstract can even contain a PDF version of the negotiation for the supplier to download. Abstracts are presented to suppliers on the buying organization's external website. Suppliers can view the details about negotiations and determine if they are interested in participating without having to log in to the sourcing application.
Forms
A form captures information from the buyer in a similar fashion as an abstract but rather than publishing data to the buying organization's website, this information is captured in an XML file that can be transferred to a third party system. The forms that are created with Oracle Sourcing typically are modeled after the third party systems so that the data collected matches their requirements. The buyer can then generate the appropriately formatted XML file and send it for publishing on the third party system.
Creating Abstracts and Forms
Abstracts and forms are composed of fields and sections. These are the building blocks that are used to create a form or abstract. When creating a form or abstract, first create these building blocks in the application. You can then use these building blocks to construct your form or abstract.
General Steps to Using the Abstract Feature:
(Super User) Create any new fields or sections (building blocks) desired on the Abstract.
(Super User) Modify and activate the existing Abstract definition.
(Super User) Set up and customize external website.
(Buyer) Add Abstract to negotiation and complete required information.
(Buyer) Publish the Abstract for a specific negotiation to an external website.
General Steps to Using the Forms Feature:
(Super User) Create fields and sections.
(Super User) Create a new form or modify an existing form.
(Super User) Add any new fields or sections on the form.
(Super User) Activate the form.
(Super User) Map to third-party XSD/DTD file
(Buyer) Complete the form and generate XML.
(Super User) Update form as requirements change
Using Abstracts and Forms
Oracle Sourcing is seeded with a draft abstract and two forms.
You may, however, decide that you want to capture different information than what the abstract or the forms are seeded with. To capture new information, you can create new sections and/or fields and use them in your abstract and forms definition.
Creating New Sections/Fields
From the Negotiations Home page, click the Administration tab.
On the Administration page, click "Abstract and Forms."
The Abstract and Forms page displays the abstract and the forms that exist in the system (initially you should see only one abstract and two forms that are seeded with the application).
On the Abstract and Forms page, click Manage Sections and Fields.
On the Manage Sections and Fields page, click Create Section to define a new section, or click Create Field to define a new field.
Use the instructions in the sections below to create new fields and sections.
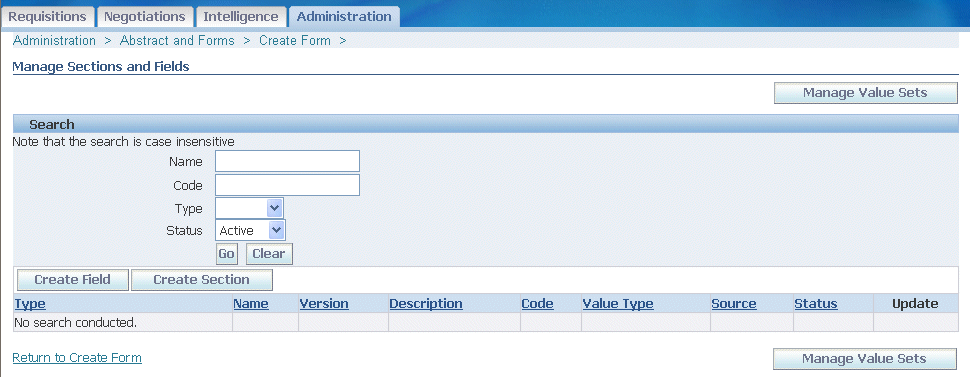
To update an existing section or field, enter all or the initial part of the section/field name or code and click Go. When the search results display, click the Update icon for the section/field you wish to update. Use the following instructions to add either a new field or a new section.
Creating New Fields
On the Create Field page, enter values for the following fields:
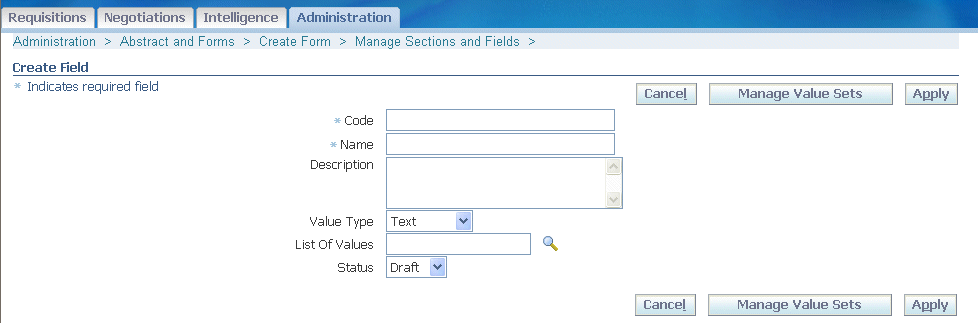
Code. This is a required, user-defined value that uniquely identifies the field. The Field code and only be up to 30 characters and can only have alphanumeric characters (Underscores are allowed within the code). If this field will be used on a form, to facilitate easy mapping, this value should match the code from the XSD/DTD to which you will be mapping.
Name. This is a required field, user-defined value that will be associated with the field. This value will appear next to the entry field/poplist/List of Values on the form that will be presented to the buyer. Enter a value that is meaningful to the buyer.
Description. This is an optional field that is presented to the buyer as a tip if data is entered. You can use this to enter any additional information that you feel the buyer needs to have to correctly complete this field.
Value Type. This specifies the type of data value the buyer can enter in the field. Possible data types are: text, number, date, date/time, and amount.
List of Values. To limit the field's data input to only a predefined set of values, click the flashlight and select the Value Set. The flashlight will query all value sets that are defined for Oracle Sourcing. To create a new value set, click on the Manage Value Sets button at the top of the page. You can also create a value set on the Administration page (see the section below for instructions on creating value sets). The following types of value sets are supported:
Table
Independent
Translatable independent
Status. When you initially enter the page, the values in this poplist will be Draft (selected), and Active. Only active fields can be added to a section or form. While the field is draft status, you can edit the Code Name and other properties of the field. You can also delete the field. Once you change the status to Active, you can no longer modify the Code of the Value Type. Also, you can no longer delete the field. You will only be allowed to make the field inactive.
Once you have finished defining your new field, click Apply
Creating New Sections
On the Create Section page, enter values for the following fields:
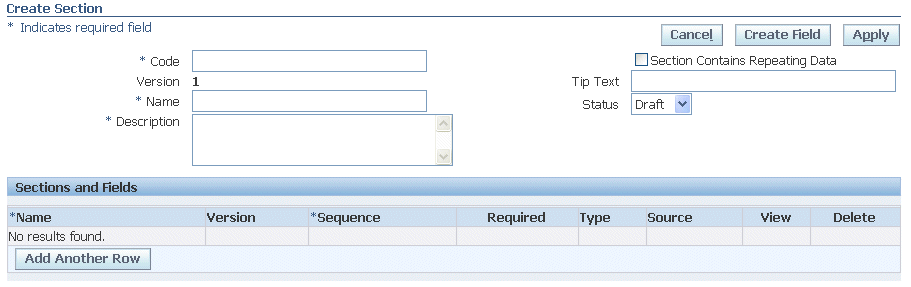
Code. A required, user-defined value that uniquely identifies the section. The section code can only be up to 20 characters and can only have alphanumeric characters (Underscores are allowed within the code). If this section will be used on a form, for ease of mapping, this value should match the code from the XSD/DTD to which you will be mapping.
Version. This is a display only field that is updated when a new version of the section is created.
Name. A required, user-defined value that will be associated with the section. This value appears above the section when the form is presented to the buyer. Enter a value that is meaningful to the buyer.
Description. A required field used to describe the section. It is not displayed to the buyer.
Section Contains repeating Data. Identifies this section as a repeating section. Repeating sections are displayed to the buyer as a table. If the section contains repeating data, no system fields can be defined to it.
Text Tip. This text is presented to the buyer as a tip below the section header. Use this to give specific instructions to the buyer for this section.
Status. When you initially enter the page, the values in this poplist are Draft (selected), and Active. Only active sections can be added to an abstract, section, or form. While the section is in draft status, you can edit Code, Name, and other properties of the section. You can also delete the section. Once you change the status to active, you can no longer modify Code or make the section repeating. Also, you can no longer delete the section. You can only make the section inactive.
Once you have activated a section, you can create a revision or make a copy of the section (you can also make a copy of the section while it is in draft status). Revisions are used to make changes to an existing section. If you find there are changes that have been made to the form that you must send to the third party system, you can use revisions to make the changes to the sections. Once you click the Create Revision button, a draft section is created with the version number incremented by one. You may then edit and activate this draft section. You will need to replace the existing section on the form with the new revision to expose it to the buyer.
Copies are similar to revisions, but they do not increment the version number and are considered new sections. You can copy an existing section by clicking the Copy Section button. This will create a draft section for you to edit. You will be required to change Section Code and Name and click Apply for the copy to be saved.
Sections and Fields. When you click Add Another Row in the Sections and Fields table, you must click the flashlight or type in the name of the section or field that you want to add. Only active sections and fields can be added to the section. Notice that you can sequence the section and field within the section to ensure the appropriate ordering. You can also specify if a field is required. You may delete sections and fields from the section until you make the section active. If the section is either active or inactive, you can not remove fields and sections. You will have to create a new revision to the section and then you can remove the fields and sections. Sections are required to have at least one field.
To add a field to the section, click Add Another Row.
Click the flashlight icon.
Search for and select the field or section you wish to add (you can add a section within a section). After you have added the field or section, specify whether it requires a response from the supplier.
Once you have added all the fields and/or sections to the section, click Apply.
Updating Existing Fields or Sections
On the Manage Sections and Fields page, enter all or the initial part of the field name or code and click Go.
When the search results display, click the Update icon for the field you wish to update.
Update the values for the field or section. You can preview the section. When finished, click Apply.
Modify the Existing Abstract Definition
Different organizations have different requirements for data they need to display to suppliers to advertise negotiations. Oracle Sourcing allows you to customize the data that will be displayed to suppliers. The Abstract consists of a main external page that lists all published abstracts and a details page to display detailed information about a single negotiation.
You can modify the seeded Abstract definition by using
From the Negotiations Home page, click the Administration tab.
On the Administration page, click "Abstracts and Forms."
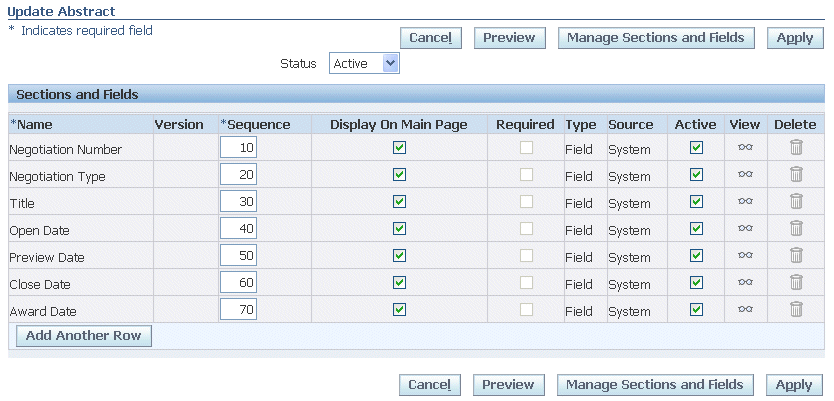
Click the Update icon for the Abstract.
The Update Abstract page displays the current definition for the abstract.
The Abstract definition uses the fields and sections defined using the instructions discussed in the previous sections. If you need to create or modify fields or sections, click "Manage Sections and Fields."
The Update Abstract page displays information about the Abstract definition and allows you to modify some values.
Status. When you initially enter the page, the values in this poplist will be Draft (selected) and Active. If the Abstract is in draft or inactive status, nothing will appear on the external webpage. Once you have updated the Abstract definition, change the status to active and click Apply. The Abstract is then available on the external page.
Name. Displays the name of the field or section.
Version. The version of the section (not applicable for fields).
Sequence. This indicates the order in which the fields and sections appear. This value can be modified.
Display on Main Page. If you check this box, this field is displayed on the main page of the Abstract. Otherwise, the field appears on the detail page when you drill down from the main page. Sections can not be displayed on the main page.
Required. Checking this box requires that buyers enter information for the field. This checkbox is not applicable for system fields since their information is supplied internally by the system.
Type. This indicates whether the entry is a field or section
Source. This indicates whether the values for the field are supplied by the user of the system.
Active. If you check this box, the field is included in the Abstract definition.
View. Clicking this icon allows you to see the details of the field definition.
Delete. Click this icon to remove the field or section from the Abstract definition. The definition must be inactivated for this icon to be available.
Adding a New Field to the Abstract
Click Add Another Row
Click the flashlight icon to access the Search and Select window.
Search for the field you wish to add. You can search by:
Field Name
Code
Type (field or section)
Description
Source
Select the field or section you wish to add and specify whether to display the field on the main abstract page. Fields not displayed on the main page are displayed on the detail drill down page.
Once you have completed your modifications to the abstract, preview the new Abstract if desired, change the status to active, and click Apply.
Customizing the External Abstract Page
Sourcing is delivered with a draft Abstract that includes a number of system fields. You should review the other system fields available and modify the Abstract definition to include all of the fields that you need. After you modify the Abstract definition, you must then activate the Abstract for it to be used as part of a negotiation.
Setting the External Page URL
Suppliers can view the details for all negotiations with published abstracts attached by navigating to the external abstract page. The URL to access the external abstract page is determined by the following profile option:
POS: External URL (display name - internal name: POS_EXTERNAL_URL)
This profile option should be set as part of iSupplier Portal setup and has the following format:
http or https://<external web server machine> <port>
For example: http://external.oracle.com:1033
An actual URL to access the abstract page set above would be:
http://external.oracle.com:1033/OA_HTML/OA.jsp?OAFunc=PON_ABSTRACT_PAGE
This external page will be available to suppliers without logging into the system. You may reference this URL from other websites to allow your abstracts to be visible to potential suppliers.
Changing User Preference Values at Login
By default, the user preferences (for example, language settings, date format, etc.) for the abstract external page are derived from the settings for "GUEST" user. However, the external page can accept the following parameters:
PON_LANGUAGE_CODE The display language for the page can be changed by passing this parameter value
PON_ORGANIZATION_ID The particular organization for which negotiations should be displayed. Otherwise, by default, negotiations from all organizations across the buyer company are displayed.
PON_NEGOTIATION_STATUS Negotiations in a particular status can be displayed. Values are: ALL_STATUS, PREVIEW, ACTIVE, AUCTION_CLOSED, AWARDED, and CANCELED.
Since each of these parameters has a default, none is required.
For example, the following Abstract URL displays all active negotiations for organization 123 in English:
http://external.oracle.com:10333/OA_HTML/OA.jsp?OAFunc=PON_ABSTRACT_PAGE&PON_LANGUAGE_CODE=EN&PON_ORGANIZATION_ID=123&PON_NEGOTIATION_STATUS=ACTIVE
See the Oracle E-Business Suite System Administrator - Configuration manual for information on setting up the GUEST user.
Customizing Your Web Page
You can customize your external web page in two ways
Adding a branding .gif image to the top of the page.
Adding custom HTML regions on the left, right, or bottom of the page.
These customizations are applied to both the Main External webpage, which lists all of the negotiations, as well as the Abstract Detail page, which displays the details for each Abstract.
Gif File Size
According to Oracle standards, advertising .gif files for Oracle HTML applications should be one of the following sizes:
460 x 60
230 x 60
230 x 30
Loading Your Customizations
Loading these files is similar to adding custom HTML regions on the buyer and supplier homepages. To load these files:
Create your .gif files. Name them
pon_SourcingExternal_Adv.gif (the branding .gif that appears at the top of the page)
pon_SourcingExternal_left.htm (the HTML region on the left side of the page)
pon_SourcingExternal_right.htm (the HTML region on the right side of the page)
pon_SourcingExternal_bottom.htm (the HTML region at the bottom of the page)
Copy the .gif files and the relevant .htm files to the following directory
$<template-path>/pon/custom/marketing/SRC_EXTERNAL/<language-directory>/
where <template-path> is a system property that is specified in the ssp_init.txt file in the iAS properties file. For example, a path might look like
/OA_HTML/pon/custom/marketing/SRC_EXTERNAL/US
Note: If a particular file is not found in the specified directory, the corresponding region is not displayed.
Linking the Abstract Page to Your Main Web Page
After you have created your Abstract page, you need to link it to your company's main web page. The link text on your main web page will usually say something like "Current Solicitations," "Solicitation Details," or "Current Negotiations."
Creating and Using Forms
Oracle Sourcing is seeded with two forms. You can modify and use these forms, or create new forms.
Planning the form
Determine the desired output.
To understand the structure of the output, you should obtain a form that displays the fields (including required fields) and sections. This helps you to determine the fields, sections and their relations to each other. If a form is not available, you should construct the form in some fashion to identify the overall structure of the form. Otherwise it is difficult to model the form in Oracle Sourcing.
Create a plan of the form.
Develop a plan for how you will model the form in Oracle Sourcing. When developing your plan, determine:
Which, if any, fields are required.
Whether there are any repeating sections.
Do certain fields only allow predefined values.
Can certain fields obtain their values from the system.
Model the form in Oracle Sourcing.
Once you have planned your form, model the design in Oracle Sourcing. This includes determining the order in which you will define data elements as well as any naming conventions.
The building blocks of your form are fields and sections. Fields are single data elements on a form such as phone number or commodity code. Sections are collections of fields and/or other sections.
Since you build your form by combining fields and sections, you should define the form in Oracle Sourcing starting at the lowest level and working up.
The codes you use should match the codes that are used in your third party system. This makes mapping your form fields easier.
Creating the form definition
On the Abstract and Forms page, click Create Form.
On the Create Form page, enter the required information:
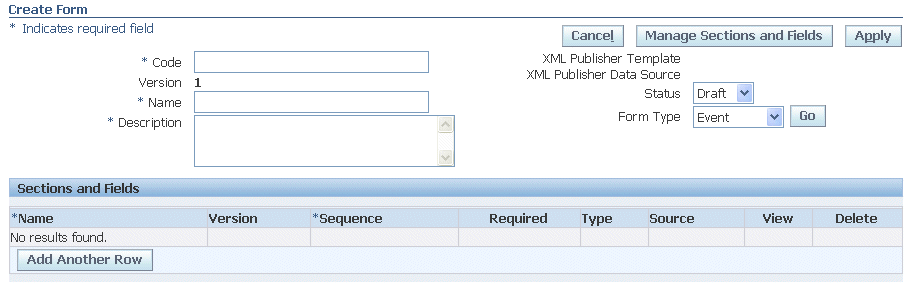
Code. A required, user-defined value that uniquely identifies the form. Code can only be up to 20 characters and can only have alphanumeric data (underscores are allowed within the value). For ease of mapping, the value should match the code from the XSD/DTD to which you will map.
Name. Required, user-defined value associated with the form. Enter a value that is meaningful to the buyer.
Version. This is a display-only field showing the version of this definition. It is updated when a new version is created.
Description. A required field that you can use to describe the form. It is not displayed to the buyer.
XML Publisher Template. Once you have mapped the form to the third party system, you will select the XML publisher template file here. Information on mapping the form and creating the template is discussed below.
XML Publisher Data Source. This is the file name of the data source (XSD file) that is created for you automatically when you change the status of a form to Active. The format of the name given to that file is "PON#" + the form name + # + version number. For example, for a form named FORM_TEST, the XML Publisher Data Source will be named PON#FORM_TEST#1. This file is used for mapping to the third party system and can be downloaded from XML Publisher. Information on mapping the form is discussed below.
Status. Values are either Active or Draft.
Form Type. Specify the scope of the form to indicate whether the information obtained from this form applies to a single negotiation or a Sourcing event (a group of negotiations).
Click Add Another Row to add a section or field to this form.
On the Create Form page, click the flashlight icon.
Search for and select the field or section you wish to add to the form.
If you added a field, specify whether a response from the supplier is required.
Once you have completed your form definition, preview the form if you wish, and click Apply.
Activating the form
From the Negotiation Home page, click the Administration tab.
On the Administration page, click "Abstract and Forms."
Locate the form definition and click the update icon.
On the Update Form page, select Active from the Status drop down menu, and click Apply.
Mapping a form to a third party XSD/DTD file
When you activate your form, Oracle Sourcing automatically creates an XSD file for you that will be used as the XML Publisher Data Source file. You will use this file to map to the third party XSD/DTD file so that the XML output generated from your form is acceptable to the third party system.
Download the XSD data source file
From the Sourcing Administration page, click Abstracts and Forms
On the Abstracts and Forms page, click the Data Source File icon for the form whose source file you wish to download.
Save the file to an appropriate location.
Create XSL file to map to the third party XSD/DTD
Next you need to obtain the XSD or DTD from the third party system that you are mapping to. This will usually be available from their website or from a technical communication.
Once you have both the XSD file for your form and the XSD or DTD file from your third party system, you need to map them to create an XSL file. XSL is a language for defining XML style sheets. Similar to a CSS style sheet that defines how an HTML file is displayed, an XSL style sheet is a file that describes how to display an XML document of a given type.
Oracle recommends you use a software package such as Stylus Studio to perform this mapping. Stylus Studio allows you to drag and drop from one XSD to another to map the elements in the two XSD files to each other. XML mapping can be complex depending on the complexity of the form. You may consider having an experienced XML developer prepare this mapping for you.
Save your mapping file.
Load the XSL file
Once the XSL file containing the mapping has been created, you must upload it into XML Publisher.
Log into Oracle Applications and select the XML Publisher responsibility.
Access the Templates page.
Click Create Template and enter the following information
Name. Enter any name to identify the template. This name appears on the Form page within Oracle Sourcing. This field is required.
Code. Provide a unique code for the template. This field is required.
Application. Enter "Sourcing."
Data Definition. Search the List of Values for the application "Sourcing" and select the data definition file that was created by the system when you activated your form.
Type. Select XSL-XML.
Start Date. The date on which you want to activate the template. You should use the default date.
End Date. The date on which you want to inactivate the template. You can leave this blank.
Description. Enter text to describe this template.
File. select the XSL file you have created from your mapping tool.
Language. Your default language.
Territory. Your default territory.
Click Apply.
Log out of the XML Publisher responsibility and into Oracle Sourcing Super User responsibility.
Access your form definition. If it is active, deactivate it.
Enter the name of your template on the Create Form page to attach this template to your form. This allows the system to generate the XML file for you that matches the format needed by the third party system.
Click Apply.
Create value sets for abstracts and forms
When creating Abstracts or Forms, you can choose to allow buyers to enter field values, or you can require buyers to select a value from a predefined list. To define a list of values for a field, you must first create a Value Set. Once you have created the Value Set, you can define the values that it contains.
From the Negotiations Home page, click the Administration tab,
On the Administration page, click "Manage Value Sets." This places you on the Values Set form in the System Administration application.
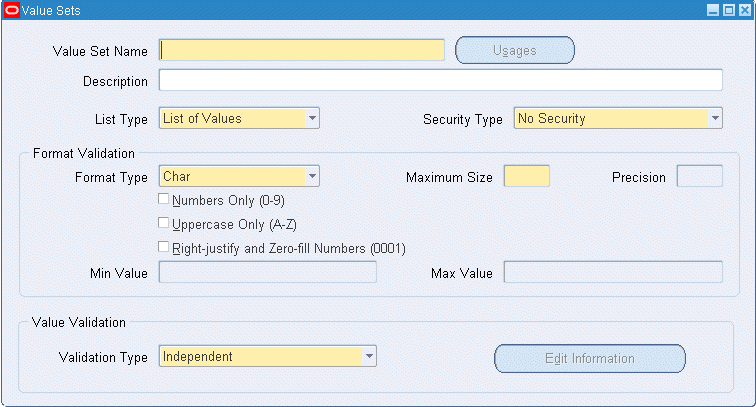
See Oracle E-Business Suite System Administrator Guide for instructions on defining Value Sets.
Create values for abstracts and forms and abstracts
Once you have created the Value Set for your Abstract or Form field, you can define its allowable values.
From the Negotiations Home page, click the Administration tab.
On the Administration page, click "Manage Values." This takes you to the Find Value Set form.
On the Find values Set form, enter the name of the value set you created in the previous step, and click Find.

On the Segment Values form, enter the allowable values for your field. See Oracle E-Business Suite System Administration Guide for instructions on defining values for value sets.
No comments:
Post a Comment