Use the Receiving Options window to define options that govern receipts in your system. Most of the options that you set here can be overridden for specific suppliers, items, and purchase orders.
To define receiving options
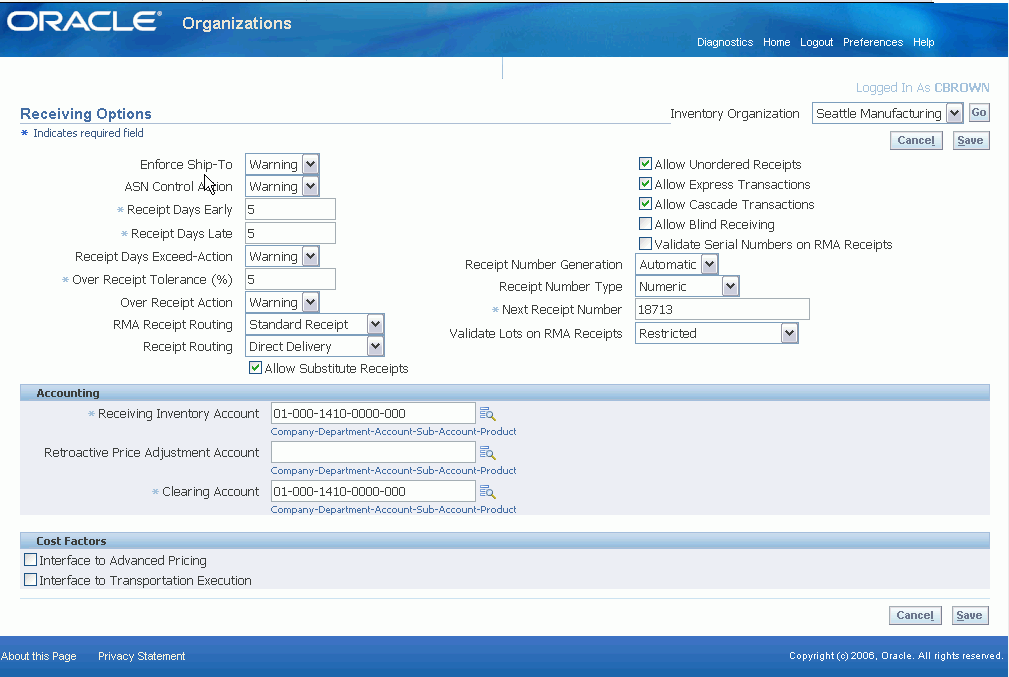
Receiving Options
Enter the Enforce Ship To location option to determine whether the receiving location must be the same as the ship-to location. Choose one of the following options:
None - The receiving location may differ from the ship-to location.
Reject - Purchasing does not permit receipts when the receiving location differs from the ship-to location.
Warning - Purchasing displays a warning message but permits receipts when the receiving location differs from the ship-to location.
Choose an action for ASN Control. This field determines how Purchasing handles receiving against purchase order shipments for which an Advance Shipment Notice (ASN) exists. Choose one of the following options.
None - Purchasing does not prevent or warn you when you try to receive against a purchase order shipment for which an ASN exists.
Reject - Purchasing gives you a message and prevents you from receiving against a purchase order shipment for which an ASN exists.
Warning - Purchasing gives you a message informing you that an ASN exists for the purchase order shipment and lets you decide whether to receive against the purchase order shipment or its ASN.
Enter the maximum acceptable number of Days Early and Days Late for receipts.
Enter an action for Receipt Days Exceed-Action. This field determines how Purchasing handles receipts that are earlier or later than the allowed number of days selected above. Choose one of the following options:
None - Receipts may exceed the allowed days early or late.
Reject - Purchasing does not permit receipts outside the selected number of days early or late.
Warning - Purchasing displays a warning message but permits receipts outside the selected number of days early or late.
Enter the maximum acceptable Over Receipt Tolerance percentage.
Enter the Action for Over Receipt Action. This field determines how Purchasing handles receipts that exceed the quantity received tolerance. Choose one of the following options:
None - Receipts may exceed the selected tolerance.
Reject - Purchasing does not permit receipts that exceed the selected tolerance.
Warning - Purchasing displays a warning message but permits receipts that exceed the selected tolerance.
Enter the default RMA Receipt Routing that you assign goods: Direct Delivery, Standard Receipt, or Inspection Required.
Enter the default Receipt Routing that you assign goods: Direct Delivery, Standard Receipt, or Inspection Required. You can override this option at receipt time by changing the destination type for specific suppliers, items, and orders if the RCV: Allow Routing Override user profile is set to Yes.
Check Allow Substitute Receipts if you want to receive substitute items in place of ordered items. You must define substitute items in the Item Relationships window before you can receive them. You can override this option for specific suppliers, items, and orders. See: Defining Item Relationships, Oracle Inventory User's Guide.
Check Allow Unordered Receipts if you want to receive unordered items. You can later match the unordered receipts to a purchase order. If you enable this option, you can override it for specific suppliers and items.
Check Allow Express Transactions to enable express deliveries and receipts.
Check Allow Cascade Transactions to enable cascading for receipts and receiving transactions.
Select Allow Blind Receiving if you want blind receiving at your site. Blind receiving helps you ensure that receivers record the exact amount they receive. With blind receiving, you cannot see the quantity due or the quantity ordered for shipments when you receive items. Purchasing ignores all quantity receipt tolerances to help ensure that you can receive the exact amount the supplier shipped.
Select Validate Serial Numbers on RMA Receipts if you want serial numbers validated. Restricts serial numbers displayed in the list of serial numbers for an RMA line.
Choose the Receipt Number Generation method for receipt numbers
Automatic: Purchasing automatically assigns a unique sequential number to each receipt when you create the receipt.
Manual: You provide a receipt number manually when you enter the receipt.
Purchasing numbers receipts within inventory organizations rather than across inventory organizations. So, for example, the same receipt number could be used by different inventory organizations.
Important: You can change the method of entering receipt numbers at any time. If you originally allow manual entry and switch to automatic entry, make sure to enter a Next Number that is higher than the highest number you assigned manually.
Choose the Receipt Number Type you want Purchasing to use for receipt numbers: Numeric or Alphanumeric.
Important: If you choose Automatic receipt number entry, you can generate only numeric receipt numbers, but you can still import either numeric or alphanumeric values from another purchasing system.
Important: If you have any alphanumeric documents in your system, you must choose Alphanumeric as your number type, regardless of your numbering method.
If you choose Manual receipt number entry, you can choose numeric or alphanumeric numbers. You can change the receipt number type from Numeric to Alphanumeric whenever you want. You can change the receipt number type from Alphanumeric to Numeric only if all your current receipt numbers are numeric.
Important: The ordering of numeric values in lists of values can appear random when you use the Alphanumeric number type. If you are using Alphanumeric numbering, consider entering all numeric values with the same number of digits. For example, if you can assume all numeric values contain six digits, you should enter the first value as 000001.
Enter the Next Receipt Number. This is the starting value you want Purchasing to use for generating unique sequential receipt numbers if you choose Automatic receipt number entry. Purchasing displays the next receipt number that will be used for a new receipt when you create the new receipt. You cannot enter this field if you choose Manual receipt number entry.
Accounting
Enter the accounting flexfield for the default Receiving Inventory Account.
Enter the account number for the Retroactive Price Adjustment Account. This is the account that receiving will use to post an adjusting entry for changes in pricing after a shipment has been received and accrued.
Enter the account number for the Clearing Account. This is the account that is used for intercompany receivables in the procuring organization when the receiving organization is not the same as the procuring organization.
Cost Factors
No comments:
Post a Comment