If Multi-Org Access Control is enabled, you can manage Transaction Types across all Operating Units accessible to you via your MO: Security Profile.
To define transaction types:
- Navigate to the Transaction Types window.
Order Management Transaction Types Window
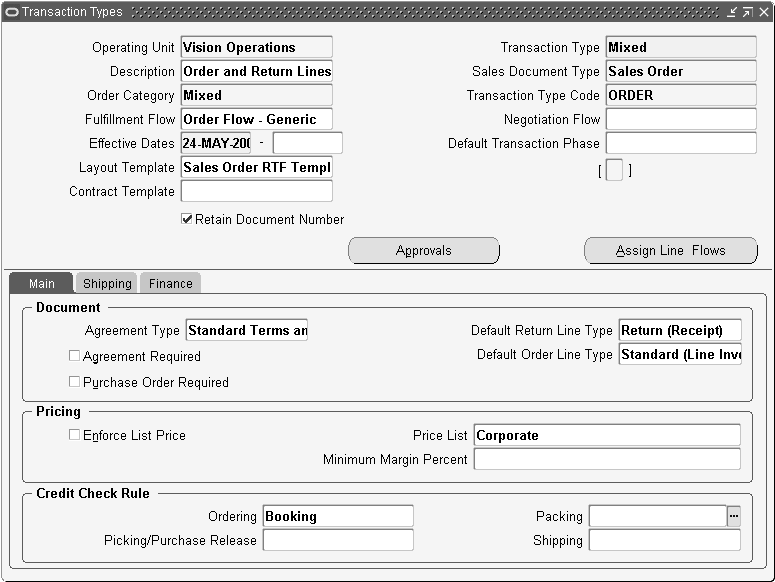
- In the Operating Unit field, select an operating unit from the list of values. The field displays your default Operating Unit, however you can pick any other value from the LOV. Operating Unit sensitive fields on the form are disabled until an Operating Unit is specified. If you specify values for these fields and then change the Operating Unit, those fields will be cleared.
- Enter the name of the transaction type in the Transaction Type field.
- Enter a description in the Description field.
- In the Sales Document Type field, select Sales Agreement or Sales Order from the list of values (for Quotes, Returns and Releases, choose Sales Order).
- In the Order Category field, select a category from the list of values. For Order Types, you can specify a value of Order, Return, or Mixed. For Line Types you can specify Order or Return. When an order type is assigned to an order, the category determines whether both order and return lines can go on the order. A category of Mixed enables an order to have both kinds of lines. For Sales Agreements, select Order.
For Order Lines, the Sales Orders window automatically sets the category to Order. Order Management seeds defaulting rules to get the appropriate default outbound or inbound line transaction type from an order type to a line based on its category code. - In the Transaction Type Code field, select order or line from the list of values to specify whether this is an order or line transaction type. Select "order" for Sales Agreements.
- In the Fulfillment Flow field, select a flow from the list of values. See Using Workflow in Order Management, Negotiation in Order Management, and Sales Agreements for more information on Fulfillment Flows.
- If a negotiation flow is needed, select it in the Negotiation Flow field from the list of values. See Negotiation in Order Management and Sales Agreements.
- Enter an effective date for the transaction type in the Effective Dates field.
- Select the default transaction phase, Fulfillment or Negotiation, in the Default Transaction Phase field from the list of values. Transaction phase determines where in the workflow the transaction begins, and can be used in defaulting rules. This field defaults to Fulfillment—a fulfillment phase must be defined; Negotiation is optional.
- Enter a value in the Layout Templates field. This field is optional. See Preview and Print Sales Documents for more information.
- Enter a value in the Contract Template field. This field is optional. See Authoring and Negotiating Contract Terms for more information.
- In order for the Quote number to become the Sales Order number, check the Retain Document Number box. This is not applicable for Sales Orders or Sales Agreements. If the transaction type is associated with both a negotiation flow and fulfillment flow, the document number can be retained when the document transitions to fulfillment. See Negotiation in Order Management for more information.
- On the Main Tab in the Document Region:
In the Agreement Type field, select a pricing agreement type from the list of values. This field is optional.
If you enter an agreement type here, you can choose only agreements with this agreement type when using this order type. Define agreement types using Order Management QuickCodes. See Define QuickCodes. - In the Default Return Line Type field, select a return line type from the list of values.
- In the Default Order Line Type field, select an order line type from the list of values.
- Select the Agreement Required check box if a pricing agreement is required. This is only applicable to order transaction types.
- Select the Purchase Order Required check box check to require purchase order numbers during order entry for orders and returns with this Order type. This is only applicable to order transaction types.
- On the Main Tab in the Pricing Region:
Select the Enforce List Price check box to prevent discounts and overriding the selling price. If this is selected, you cannot apply discounts to the order line list price when you use this order type and you cannot override the selling price, unless the profile option OM: Discounting Privilege is set at the appropriate level. - In the Price List field select a price list from the list of values to serve as a defaulting source. The list of values displays global price lists and price lists defined for the Operating Unit selected.
- Enter a minimum margin in the Minimum Margin Percent field. This field is optional.
- On the Main Tab in the Credit Check Rule Region:
In the Ordering field, select an ordering credit check rule from the list of values. This field is optional. - In the Packing field, select a packing credit check rule from the list of values.
- In the Picking/Purchase Release field, select a picking credit check rule from the list of values. .
- In the Shipping field, select a shipping credit check rule from the list of values. This field is optional.
Select credit check rules to use when performing checking credit at either Booking, Pick Release and Purchase Release (for drop shipments), Packing, or Shipping within the corresponding Credit Check Rule fields.
You can select a credit check rule for each field within the Credit Check Rule region, or choose to select combinations that suit your business purposes. For example, you can choose to select a credit check rule for booking only, or booking and shipping.
If you leave any of the Credit Check Rule fields blank, no credit checking will occur when an order or order line reaches the corresponding workflow activity within the order or line flow, using the order or order line type specified.
Note: When a transaction is created, Order Management automatically creates a Document Sequence Category of the same name for you. You can then go and assign a document sequence that you have defined for order numbering to this document sequence category. Document sequence categories are not MLS Compliant. Order Management recommends that you create your transaction types in the base language of your installation to minimize potential confusion. Two document sequence categories are created - one, with the same name as that of the transaction type and the other with the same name as transaction type but appended with the string '-quote.'
Note: Workflow assignments are required for order types to support the creation of quotes and sales orders as well as for types to support the creation of Sales Agreements.
To define Shipping Related Attributes for Order Management order and line transaction types:
- Navigate to the Transaction Types window. Order Management > Setup > Transaction Types > Define
Note: None of the fields in the Shipping tab are applicable to Sales Agreements.
Order Management Transaction Types Window Shipping Tab

- Select the Shipping tab.
- Warehouses are synonymous with inventory organizations in Oracle Manufacturing.
- Select the appropriate Shipping Method from the list of values.
- The Shipment Priority field gets its values from Quick Codes.
- Freight Terms are defined using Order Management QuickCodes.
- In the FOB field, enter the FOB point. Define FOB points using Receivables QuickCodes.
- In the Shipping Source Type field, select the ship source type, internal or external, from the list of values. This determines if the order line is sourced externally through Drop Shipment, or sourced internally. This field is optional and applicable only to Line Transaction Types.
- In the Demand Class field, select a region from the list of values. Define demand classes using Manufacturing QuickCodes. See Define QuickCodes.
- In the Scheduling Level field, select one of the following options from the list of values:
- Inactive Demand without Reservations
- Inactive Demand with Reservations
- ATP Only
- Allow all scheduling actions
- No Reservations
Note: If you do not specify a value for an Order Transaction type, the application interprets the null value as Complete Scheduling. If you do not specify a value for a Line Transaction Type the application uses the value from the Order Type on the Order.
- Select the Inspection Required check box if an inspection is necessary. This is applicable only to return line transaction types.
- Select the Auto Schedule check box if you want automatic scheduling for this order type. This is applicable only to order transaction types.
- In the Line Set field, select Arrival or Ship from the list of values. This field is optional. See Line Sets: Ship/Arrival in Scheduling.
- Select the Fulfillment Set check box to apply a fulfillment set. Selecting this enables fulfilling all of the lines of an order at the same time. If you put the lines in a fulfillment set, you cannot fulfill (invoice) the lines until all of the lines are ready.
- Navigate to the Transaction Types window.
Note: None of the fields on the Finance tab are applicable to Sales Agreements, the regions are Rule, Source and Credit Method For.
Oracle Order Management Transaction Types Window Finance Tab

- Select the Finance tab.
In the Rule region on the Finance Tab: - The Invoicing Rule controls the amount and timing of your invoices.
- An Accounting Rule controls the amount and timing of when you recognize revenue for this order.
- In the Source Region on the Finance tab, within the Invoice Source field, select a Source from the list of values.
- In the Non Delivery Invoice Source field, select a source from the list of values.
- In the Credit Method For region on the Finance tab, select a credit method for invoices from the Invoices With Rules pop up menu.
Oracle Receivables uses these accounting credit methods when adjusting the revenue account assignments of invoices using multi-period invoicing and accounting rules. See: Crediting Transactions, Oracle Receivables Implementation Guide.
- LIFO (Last In First Out): Backs out revenue starting with the last general ledger period, and reverses all prior periods until it has used up the credit memo
- Prorate: Credits an equal percentage to all account assignments for that invoice
- Unit: Reverses the revenue for the number of units you specify from an original line of the invoice
- Select a credit method for invoices from the Split Term Invoices pop up menu.
Oracle Receivables uses the following the Invoicing credit methods when crediting the installments of invoices that have multiple installments (split term invoices). Crediting Transactions, Oracle Receivables Implementation Guide.
- LIFO (Last In First Out): Credits the last installment to be credited first and then credits all prior installments until all of the credit is used
- FIFO (First In First Out): Credits the first installment first and then credits all subsequent installments until all of the credit is used
- Prorate: Prorates the credit received by the installments of invoices by the amount remaining on their installments
In the Receivables Transaction Type, select a value from the list of values. This is applicable if you use Oracle Receivables. Invoice types designate invoice status, invoice printing options, credit memo type, and whether the invoice posts to General Ledger or creates an open receivable. Ensure the Tax Calculation Flag for the Receivables transaction type you choose is set accordingly as this will determine whether Tax is calculated for the order line. - The Tax Event determines when Order Management calculates the estimated tax amount for a transaction.
- In the Cost of Goods Sold Account field, select and account from the list of values
This is applicable only for order transaction types. - In the Conversion Type field, select a conversion from the list of values. In the Currency field, select a currency from the list of values. If you choose User as the currency conversion type, the Sales Orders window requires you to enter the conversion rate and date. This is applicable only for order transaction types.
To assign workflows to transaction types:
Use this procedure to assign workflows to line transaction types. The combination of the order type, the line type, and the item type determines the line workflow.
Line flows are required for Sales Orders but not for quotes. Once you have created a document using an order type you cannot change the existing line workflow assignments. Instead, enter an end date for the existing assignment and enter a new assignment for the for the new workflow.
Note: This is not applicable to Sales Agreements.
- Navigate to the Transaction Types window and query the desired transaction type.
- Click Assign Line Flows.
Line Workflow Assignments Window

- In this window, select the order type/line type/item type combination to which you want to assign a workflow.
If you leave Item Type blank, the workflow applies to all item types for the line type (unless they have a specific assignment in this form).
If you use line type ATO Models, use item type Configured Item and return line types use item type Standard even if they are for configurations. - In Process Name, select the workflow that Oracle Order Management should use for the order type/line type/item type combination.
If you do not assign a workflow to a configured item type, the configured item does not use a workflow. - In Start Date and End Date, select the time period during which the assignment is effective.
- Save your work.
No comments:
Post a Comment