Processing constraints are rules that control who can change what and when they can change it. Processing constraints can prevent certain changes, but can also be set up to perform actions based on those changes. They can define actions that can result from these changes, such as requiring a reason for the change, triggering an action in Audit Trail or Versioning, or raising an Integration Event. This is step twenty-four of the Order Management Setup Steps.
This section describes how to set up your processing constraints based on validation conditions in validation templates (for example, Booked = Yes) which are evaluated for groups of records (record sets).
Prerequisites
Become familiar with the Processing Constraints that are delivered with the Order Management Application.
Note: After updating constraints and/or conditions, close and reopen the Sales Agreements or Sales Orders window for the updated constraints to apply correctly.
To set up processing constraints:
- Navigate to the Define Processing Constraints window.
Order Management Processing Constraints Window
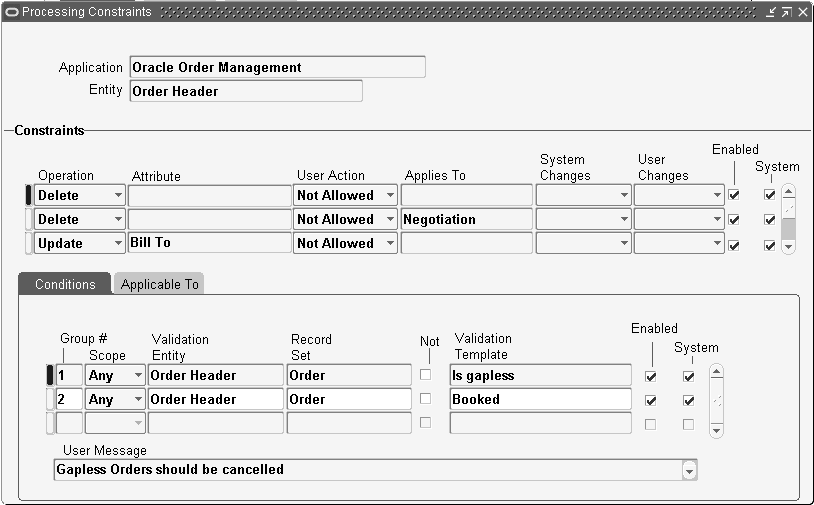
- Query Application for Oracle Order Management and Entity for the entity for which you want the processing constraint, for example, Order Header or Order Line.
- Move to Constraints. In the top area of the region, enter each constraint in a line.
- In Operation, select the operation that you want to constrain.
- Select an Attribute to constraint, based upon the operation selected.
- If you select the value UPDATE for the Operation field and you do not select an Attribute value, the constraint allows no update to any field of the entity, by any user.
- In User Action, select one of the following:
- Not Allowed: You cannot perform the constrained operation
- Require Reason and History: You can perform the operation only if you enter a reason. Use this with Operation CANCEL, Operation UPDATE if the constrained attribute is Ordered Quantity only, and for recording Audit Trail history when requiring a reason for an attribute change
- Requires History: You can perform the operation and will not be prompted to enter a Reason. You still have the option to enter both a Reason and Comment, and if you do so, the information is recorded. Use the value for enabling Audit Trail history to be recorded without a reason for an attribute change
- Select a value for the System Changes field. The value selected in this field determines if system changes are allowed, despite the constraint. Choose from:
- Always: System changes allowed
- Never after Insert: System changes allowed if the entry has not been saved to the database
- Select a value for the User Changes Field. Choose from:
- Never: The user is always constrained
- Never after Insert: The user is constrained after the entry is saved to the database
- The Enabled field indicates whether the current constraint is active. This allows constraints to be temporarily disabled if necessary.
- System check box - If a Constraint has the System check box selected, you cannot update the constraint definition.
- Move to the Conditions tab. Enter a constraining condition for the selected constraint. The selected constraint is determined by the previous cursor position prior to moving to the Conditions tab region.
- In the Group Number field, enter a numeric value according to the following principles:
- For conditions that should together evaluate to TRUE (AND conditions), enter the same group number. The constraint applies if the entity in question meets all of the conditions defined.
- For conditions that should together evaluate to OR (OR conditions), enter a different number for each record. The constraint applies if the entity in question meets any one of the conditions defined.
- In Scope, if the record set applies to multiple records, indicate the scope of evaluation of the record set for this condition. An example of a record set that applies to multiple records is the record set of all of the lines of a sales order. Select one of the following:
- Any: The condition is satisfied if one of the records meets it, for example, the condition is satisfied if one of the sales order lines is booked
- All: The condition is satisfied if all of the records meet it, for example, the condition is satisfied if all of the sales order lines are booked
- In Validation Entity, enter the entity for which the condition is validated. You can enter the same entity as the constraint (at the top of the Constraints region) or you can enter an entity related to the constraint. For example, if the constraint is against Order Header, Validation Entity can be Order Line.
- In Record Set, select the record set that corresponds to the entities to which the constraints process should apply the condition. For example, if you enter the order line record set Line, the condition is evaluated against the order line in question. If you enter the order line record set Order, the condition is evaluated against any or all (depending on the scope) lines of the order in question.
If Validation Entity is different from Entity (at the top of the form), you can only select record sets based on the primary key of the validation entity. - Select the Not check box (the negative condition modifier) to direct the constraints processing to evaluate the NOT condition of Validation Template. For example, if you expect to select Validation Template Booked, selecting NOT creates the condition of not booked for the constraint.
- In Validation, select a validation template. This item specifies the condition being evaluated.
- Enabled- The Enabled field indicates whether the current constraint is active. This allows constraints to be temporarily disabled if necessary.
- System check box:
- If a Constraint has the seeded check box selected, and the constraint condition check box is also selected, you cannot update the constraint condition.
- If a Constraint has the seeded check box selected, and the constraint condition check box is not selected, you can update the constraint condition.
- In User Message, enter the trailing portion of the error message that the constraint processing should display when the user violates the constraint.
For example, if the constraint was to not allow an update of the item field on the order line if the line has been previously booked, constraints processing displays the error message You are not allowed to update the item; the item is booked. - Move to the Applicable To tab and specify who the constraint applies to.
Processing Constraints Window
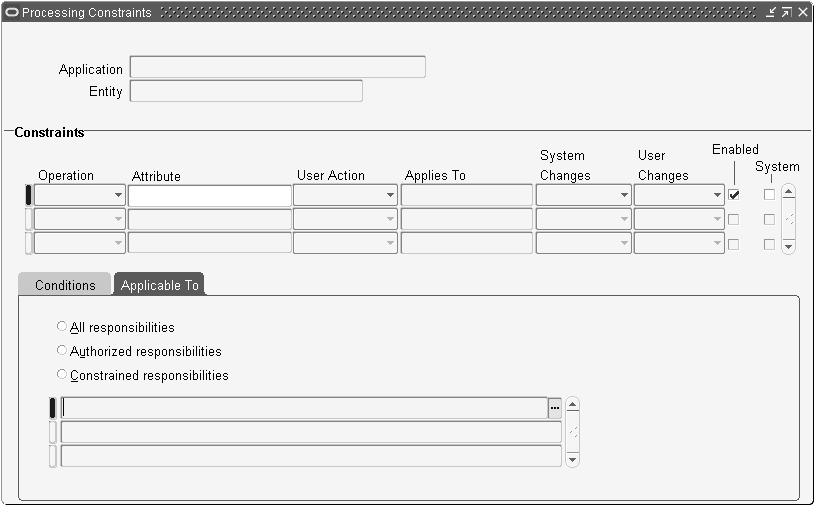
- Select one of the following:
- All responsibilities: The constraint applies to all responsibilities.
- Authorized responsibilities: The constraint applies to all responsibilities except ones that you specify. Specify the excepted responsibilities in the untitled lines below your selection.
- Constrained responsibilities: The constraint applies to the responsibilities that you specify. Specify the excepted responsibilities in the untitled lines below your selection.
- Save your work.
Note: Please ensure that when you are creating or updating Processing Constraints, the window that will be using the constraints (e.g. Sales Order, Sales Agreement) is closed. The constraints are cached and if they are updated while a sales transaction window is open, the updated constraints may not function according to the updates. Therefore it is advisable to close all sales transaction windows before updating Processing Constraints.
Processing Constraints Example
To set up a processing constraint that forbids update of the sales order header order type when there are order lines created or when the order is booked, do the following after navigating to the Define Processing Constraints form:
- Query in the top of the form:
- Application: Oracle Order Management
- Entity: Order Header
- Enter on a new line at top of the Constraints region:
- Operation: Update
- Attribute: Order Type
- User Action: Not allowed
- Leave System Changes, User Changes blank
- Clear Seeded check box
- Enter in the first line of the Conditions tabbed region:
- Group Number: 1
- Scope: Any
- Validation Entity: Order Header
- Record Set: Order
- Clear NOT check box
- Validation Template: Booked
- Clear Seeded check box
- User Message: the order is booked
- Enter in the second line of the Conditions tabbed region:
- Group Number 2
- Scope: Any
- Validation Entity: Order Header
- Record Set: Order
- Clear NOT check box
- Validation Template: Lines Exist
- Clear Seeded check box
- User Message: the order has lines
- Query in the top of the form:
Processing Constraints Usage
As you use Order Management, processing constraints are evaluated for any entity you try to cancel, delete, create, split, or update. If you are trying to modify an order line, Order Management evaluates the processing constraints for the Line entity.
Using Processing Constraints
Versioning
To set up Automatic Versioning, you must set up processing constraints to enable a select attribute update to autogenerate versioning
No comments:
Post a Comment